Tuesday, December 28, 2010

Picture of the Day - 12/27/2010


"Zoo Lights" at the Denver Zoo - While the Denver Zoo also has an annual "holiday light safari", I couldn't help but try out some abstract photography this evening. There are many ways to create interesting abstracts and most cameras (even the small compacts) can be set up to do this. While "zoom blurs" may only be done with lenses that can be manually zoomed during the shot, the "jiggle" or (horizontal or vertical) "pan" blurs may be done with any camera. Remembering that the actual image ends up on the imager upside down, to achieve the "swirl" blur as pictured (a series of "smiles"), you need to swirl up and down in a circular fashion. For the best effect, it helps to look for a multitude of multi-colored and closely-spaces lights. Trial and error is the order of the day for these and it usually takes several tries before I like the result. Camera settings: ISO 1600, aperture 5.6, shutter 1/6 second. Be sure to pre-focus first.

Picture of the Day - 12/26/2010


Electric Safari, Cheyenne Mountain Zoo (Colorado Springs, CO) - After a delightful BBQ rib dinner, cooked by Chris & Alex, we all headed off to the local zoo for some night time photography of the lights. Here's a shot near the entrance showing some of the lighted animals and walkway. The zoo is unique in that it is (likely) one of the highest in altitude at 6800 feet and its built onto the side of Cheyenne Mountain, which requires a certain amount of exercise to experience all the exhibits. The Electric Safari is an annual event held right around Christmas time and it attracts quite a crowd!

Sunday, December 26, 2010

Picture of the Day - 12/25/2010


Merry Christmas! - For all those who celebrate it, Foxie wishes you all a very Merry Christmas from our house to yours! Best wishes & God's blessings for the New Year!

Ken, Sheila and Foxie

Picture of the Day - 12/24/2010


Stare At This - I'm sure this image has been floating around for a while now, but I thought it appropriate for this Christmas Eve. Stare at the four dots for 20 to 30 seconds, close your eyes and tilt your head back a little. What do you see?

Friday, December 24, 2010

Picture of the Day - 12/23/2010


East Face of Mt. Whitney - I took this photo last February on my way to the NANPA (www.nanpa.org) photo conference in Reno. I was just entering the town of Lone Pine from my stay the day before in Death Valley. Whitney is the highest peak in the continental U.S. at 14,495 feet. While I've climbed it twice via the main trail, I've yet been unsuccessful in climbing the east face. Coming upon this scene this year reminded me of my attempt to climb it while in college. My climbing partner and I made it about 3/4 of the way up, before being chased back down by a lightning storm. It's hard to tell the scale, but it took us over 20 rappels to get back down and out of danger. Photographed with a Canon 1D Mk2 with 100-400 mm lens at 310 mm. ISO 200, f8 and 1/800 second. I did the B&W conversion in Lightroom.

Thursday, December 23, 2010

Picture of the Day - 12/22/2010


Lunar Eclipse with Tower of Babel - Here's one more take on Monday night's lunar eclipse at the Garden of the Gods Park - this time with the moon fully shadowed by the earth. If magnified, the moon would look rather orange. Focus was achieved by switching to Live View mode and adjusting the moon for best sharpness. Taken with a 16 - 35 mm wide-angle zoom set to 16 mm on a Canon Rebel T2i body. ISO was 800 with shutter at 30 seconds and f5.6. The rocks were lightened slightly and the sky cleaned up in Lightroom. The rocks were lit only by ambient light from a nearby building.

Tuesday, December 21, 2010

Picture of the Day - 12/21/2010


Lunar Eclipse, Garden of the Gods Park - Sheila and I spent the better part of the night last night (and this morning!) photographing the total lunar eclipse. It was fascinating to watch the full moon with its bright light casting shadows around us, with near full visibility...to near total darkness, in a matter of several minutes. I had set up two cameras - one with a 300 mm / f2.8 (and 1.4X teleconverter) on my Canon T2i body, in order to obtain close-ups of the moon itself. The other one was set up in a fixed location near the Tower of Babel rock formation, hooked up to an intervelometer shutter release, set to fire every 8.5 minutes. The primary purpose of this one was to capture a sequence of moon shots, which would later be combined into a single frame showing the moon at different stages of eclipse. The 8.5 minutes was calculated such that none of the moon images would overlap. The tripod was located such that the sequence would have arced directly over the rocks.

This is one frame from that sequence, showing the moon as its just coming out of umbral stage. The slight sliver of crescent moon is causing a "starburst" effect, which I thought was unique. This was photographed using my Canon 5D with 24 to 70 mm /f2.8 lens (adjusted to 30 mm) and  set to ISO 800, 30 second exposure at f5.6. It was slightly adjusted with Lightroom to bring up the shadow detail in the rocks. I also applied sharpening and noise reduction to clean up the sky. Because of the 30 second exposure, if one were to magnify this image, you'd be able to see slight arcs in the stars, due to the earth's rotation. The light on the rocks is from the natural ambient light from the nearby building in the main parking lot where we were located.

Note that focussing any lens at night (especially during a total eclipse) is troublesome. If your camera body has a "live view" mode (or equivalent), where you can see the actual image via the LCD screen, it's possible to set focus on bright objects, such as the moon or stars. You'll want to switch to Manual focus, so that successive shots don't end up defocussing the lens. For camera bodies without "live view", it's tougher. It's generally best to prefocus the lens during the day or early evening, switch to Manual focus and tape the adjusting ring down with gaffers tape. This assumes there will be no drastic temperature changes, as this can affect the focus point (mainly on large telephotos). For these lunar shots, I set the exposure to Manual and diddle around until I get proper exposure for the moon. To see stars well, you'll want to set the aperture for around f4 to f5.6 and the ISO to a setting where they start to show well in the LCD screen. The shutter speed should be 15 to 30 seconds for good detail. If you're fortunate enough to have some foreground, it can be light-painted with a strong flashlight during the exposure.

Thursday, December 16, 2010

Picture of the Day - 12/16/2010


Merry Christmas 2010 - This photo was taken earlier this year during a winter weekend. We were staying with good friends Larry and Terrie at the Mt. Elbert Lodge, near Twin Lakes, Colorado. The sky was pretty clear and I stayed up late to capture this scene overlooking some of the other cabins - along with a starry sky. You can see Orion just right of center. For a situation like this, I tripod-mounted the camera and set the exposure to manual (using f8 and adjusting the shutter by trial & error). To emphasize the sky, I used a wide angle (16-35 mm) lens. Adjusted slightly using Lightroom 3 with text added in Photoshop.

Tuesday, December 14, 2010

Inspirational Prints Added

In time for this special Christmas season, I just added several new inspirational prints in the Gallery section of the Web site. These would make ideal gifts for your loved ones. If ordered by the 17th, I should be able to deliver by Christmas.

Friday, December 10, 2010

Mobile Connectivity on the Road

Those of you who travel a lot - especially into remote areas and who need internet connectivity for email or conducting business on the road - this may be your solution! My job takes me on the road quite often and I need regular access to email and the internet. There are many providers of "mobile connectivity" for areas not blessed with free Wi-Fi, but most force you into buying an expensive 2-year contract along with their plug-in USB "dongle". Virgin Mobile, on the other hand, offers a no-contract, month by month plan, which is ideal for the occasional traveler. I purchased their MiFi 2200 credit card-sized solution ($150), which works off the Sprint (or roams to Verizon's) network - the combination of which is one of the most extensive coverages in the U.S. This can be ordered off their web site (http://www.virginmobileusa.com/) or purchased through Best Buy and others.


This small card allows wireless connection of up to five devices. So, once its turned on, both Sheila and I have access simultaneously! I can be answering client emails while Sheila surfs the Web or goes through her email. The speed varies, but both Spring and Verizon have fairly fast networks (up to 150k bps rates). While not the speediest, it gets the job done! Best of all, you're not locked into a long-term contract. I just pay $40/month or $10 for 10 days - just for the time I need!

Wednesday, December 08, 2010

Cradock fotoSoftware Holiday 30% Off Sale!

Cradoc fotoSoftware is having a holiday 30% off sale! This applies to new customers and existing customers who upgrade. fotoQuote Pro 6 is the pricing tool I most recommend during my Business of Photography seminars. Click here for more...

Monday, December 06, 2010

Picture of the Day - 12/6/2010


Snowy Ridge, Rocky Mountain N.P. - The day after Thanksgiving, we drove Chris & Alex to Estes Park and took a loop through Rocky Mountain N.P. While there, we were able to photograph bighorn sheep, elk, and lots of icy reflections in the creeks and streams. On the way back to Estes, we noticed the snow blowing off the ridge of the craggy mountain range. Glad we were in a warm car, as it looked pretty cold up there!

Saturday, December 04, 2010

Picture of the Day - 12/4/2010


Grasses in Snow - The morning following our first decent snowfall a few days ago, I peeked out the front door into the chill air to capture this image of grasses poking up through the fresh blanket of snow. A single ray from the sunrise lit up the row; the effect lasting for a brief moment, and then was gone.

Friday, December 03, 2010

Pro Tip - Submitting Images to Photo Editors

I've been writing for various hobby and professional magazines for 25 years now and after speaking with many editors over the years, as well as attending several writing and photography workshops on this subject, I've got it down pretty well. I go over much more detail in the Business of Photography seminar, but I did want to mention an easy way to get sample images (or "comps", as they're called) to photo editors and buyers.

First, you need to establish a relationship with the editor(s). Avoid contacting the "editor in chief" as they're usually more a management role, than "worker bee". Don't be afraid to drop the photo editor or assistant editor a short email or letter describing yourself along with a few sample images. Don't overwhelm them - they're under constant pressure to "get out the next issue" and they may take a while to get back to you. Generally, they prefer not to take phone calls. One thing I do 2 to 4 times a year is send them a "promo sheet" with a few of your BEST recent representative images. Need I mention, images that reflects the needs of the specific magazine? Make sure it's printed on classy paper and include your contact info. You want it beautiful enough they'll want to pin it up on their wall!

Second, you need to know what images they need. Don't just send a bunch of unsolicited pictures - especially via email. Many magazines publish writers and photographers guidelines on their Web site. You also want to locate the "editorial calendar", oftentimes located in the "Advertisers" section. Be sure to read through these, as often they will mention how they'd prefer to receive pictures (email, CD, light table on Web site). If you can, request to get on their "want list" email distribution. This is an emailed listing of specific images they're looking for in the months ahead. Remember, magazines have a three to six-month lead time. Right now, they're working on the spring through summer 2011 issues.

Next is the actual delivery of comps (sample low-res images they can use for the initial pasteup drafts). Most editors won't want you to attach them to an email, unless they're in a hurry to get them. This is where you really need to listen to how they wish them delivered. Lately, I use Photoshop Lightroom to adjust the images and then I use the included plug-in that uploads the selected images directly to my PhotoShelter account. Once the upload is complete, I create a "light table" section for just the editor to see. PhotoShelter automatically creates the email notification and includes a series of thumbnail images with your pictures. There is an included link within the email they can click on to see the larger images and to download comps for layout purposes. The whole delivery process takes just a few minutes.

Should one, or more, of your images get accepted, the editor will want the originals (high-res) converted to TIFF and delivered "yesterday", so you'll want to have already loaded in some ftp software in order to upload the images directly to one of their ftp servers. I use CuteFTP, which works well. The editor will provide the ftp address and password to get access to their server. That's it!

Photo Tip - The Thought Process of Photography

After several years of photographing nature, I've developed a consistent sequence or process of thought prior to actually photographing a subject. I run through this sequence for every situation and because it's sort of a "check list", I rarely miss a step. I thought I'd pass this along to you, as I'm frequently asked questions about the technical aspects of my images along the lines of lens types, shutter speeds, and so forth. If you learn a consistent process (and it may be different for you), after a while it will become second-nature.

Depending on the subject I intend to photograph, I'll run through the equipment I'll likely require before leaving home. Will I need special lenses or lighting? How about spare batteries and memory cards if it will be an extended shoot? Scenics or wildlife or both? If it's a commercial shoot, will it be a portrait session or product photography? Will I need to bring studio gear?

Once I answer these general questions, I'll pre-visualize the shots I intend to take. Of course, if it's a commercial shoot, I'd probably have developed a "shot list" in advance. Let's say this example will be a nature shoot. Here's the thought process I go through once I arrive at the location and start scouting for good spots.

1. Is the lighting bright or dim and can I use a tripod or must I hand hold? For handheld, I'll ensure the image stabilization is "on" and I may increase the ISO to an appropriate speed. If tripod-mounted, image stabilization should be switched "off". I also make sure my exposure compensation is "zero" (or, for my Canon bodies, I find setting it to -0.3 is best for the initial exposure).

2. Since I normally shoot in raw, the white balance is really immaterial, but to save a step in post-processing, I may pre-adjust the white balance to the appropriate lighting source. If it's critical to get the white balance correct (mixed lighting, for example), I'll go through a custom white balance. If shooting snow, especially if including shadow areas, or sunsets/sunrises I'll automatically place the white balance in "Cloudy" to warm up the image. If you're shooting JPEG, then you'll definitely want to pre-set your white balance!

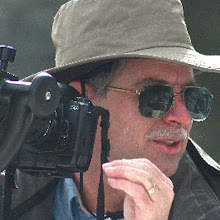
3. Is the subject wildlife or scenic? If wildlife, I'll use the appropriate telephoto and support the camera. If scenic, either the normal zoom (24-70mm) or wide angle (16-35mm) if I need the foreground to dominate. It's best to use a tripod for either case.

4. Narrow or wide depth of field (DOF)? Scenics generally use a wide DOF, while flower or wildlife portraits use a narrow DOF. Set the mode to Aperture Priority and adjust the aperture accordingly. Set the focus to the hyperfocal distance (usually 1/3 up from framed image in the viewfinder).

5. Do I wish to show motion (stream or waterfalls) or create abstracts (zoom or "jiggle" blurs)? Set the mode to Shutter Priority and the shutter to an appropriate setting. I generally use 1/10th to 1/4 second for moving water. Any more and the water starts to lose detail and overexpose. (If shooting sports, set the shutter to 1/500th second, or faster.)

6. Is the subject neutral-toned or lighter/darker? Preset the exposure compensation in advance and check the histogram after the first shot. Strive to "expose to the right", but avoid extreme overexposures. If photographing sunsets, sunrises or red rock formations (Southwest or Garden of the Gods, etc.) watch that the red channel doesn't oversaturate.

Usually, I'm pre-adjusting the camera as I'm approaching the subject. By using this thought process enough times, it will become second-nature.

Thursday, December 02, 2010

Picture of the Day - 12/1/2010


Succulent in Sandstone - on the way to dropping off some prints to a show in Colorado Springs, I stopped for a while in Garden of the Gods Park and spent a few contemplative minutes photographing along Ridge Rd. Not the typical plant found in the park, this succulent, growing from a crack in the sandstone caught my eye. Often, the simplest composition is the most powerful visually. Photographed with the new Canon Rebel T2i.